
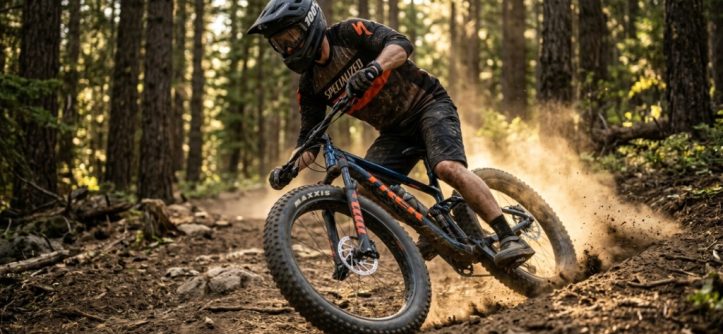
The trail ahead looks perfect—turns through loose sand, a punchy climb over packed snow, and a root-strewn descent after a rainstorm. You want to ride it all, but your current bike is either sinking in the soft stuff or rattling your teeth on the rocks. You need a fat-tire mountain bike. But not just any fat bike the best fat-tire mountain bike + fat bike for trail riding is the one that climbs with grip, descends with confidence, and doesn’t weigh you down. This guide will help you cut through the noise and choose the bike that actually fits your riding style, your terrain, and your budget.
What Makes a Fat Tire Mountain Bike Different for Trail Riding?
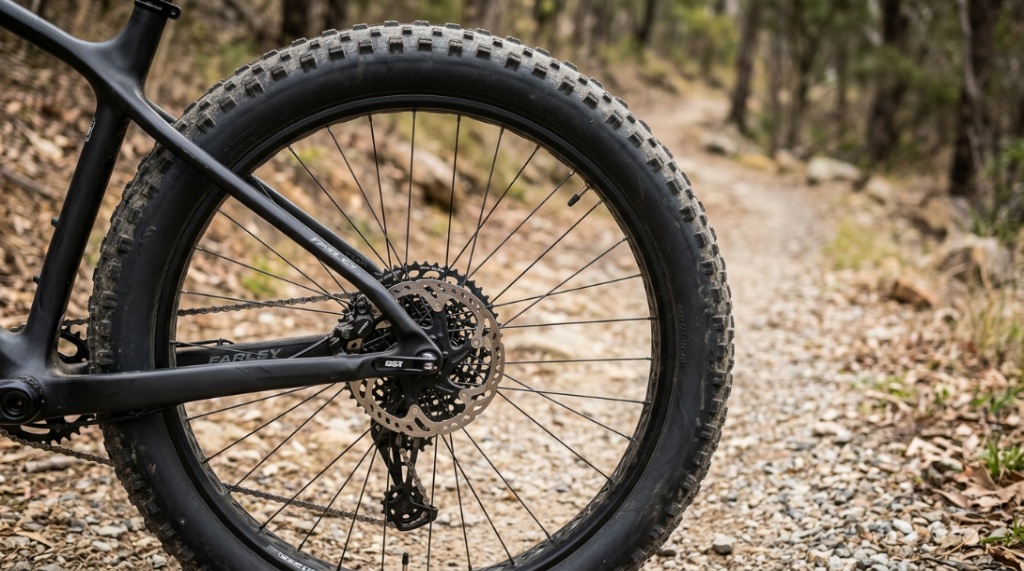
A fat tire mountain bike uses tires that are 3.8 inches wide or larger, compared to standard mountain bike tires that are 2.2 to 2.6 inches. This increased surface area provides dramatically more traction and floatation on loose surfaces like sand, snow, mud, and gravel. For trail riding, this means you can maintain momentum where narrower tires would spin out or sink.
The differences go beyond tire width. Fat bikes typically have wider rims, longer wheelbases, and slacker head angles to handle the added tire volume and provide stability at lower pressures. Many modern fat bikes are now purpose-built for trail riding, not just snow, featuring geometry borrowed from aggressive hardtails and full-suspension trail bikes.
Key Differences at a Glance
- Tire volume: 3.8″–5.0″ vs. 2.2″–2.6″ on standard mountain bikes
- Rim width: 70–100mm vs. 25–35mm
- Frame clearance: Designed for massive tires with mud room
- Suspension needs: Often run rigid or with minimal travel due to tire cushion
- Weight: Typically 2–5 lbs heavier than comparable trail bikes
Why Should You Choose a Fat Bike for Trail Riding?
You should choose a fat bike for trail riding if you frequently encounter loose, unpredictable surfaces or if you want to extend your riding season into winter and wet months. The tire volume acts as natural suspension, allowing you to run lower pressures (8–12 PSI) for a smoother, more controlled ride over roots and rocks.
Fat bikes also excel at building confidence. The massive footprint makes the bike feel planted, especially for beginners or riders coming back from injury. Seasoned riders benefit from the unique challenge of pedaling a heavier, more stable platform that demands better line choice and momentum management.
Real-World Advantages
- You can ride on snow-covered singletrack without studs
- Deep sand becomes rideable, opening up beach and desert trails
- Wet, muddy trails are less intimidating because you float over the slop
- The cushioned ride reduces arm pump and back fatigue on long days
Which Tire Width is Best for Trail Riding?
For dedicated trail riding on mixed terrain, a tire width of 3.8 to 4.0 inches offers the best balance of flotation, rolling resistance, and cornering precision. Tires wider than 4.5 inches are better for deep snow and sand where maximum float is needed, but they feel sluggish and vague on hardpack and singletrack.
A 3.8-inch tire at 10–12 PSI provides enough volume to smooth out roots and rocks while still allowing you to lean the bike into turns and feel the trail beneath you. This width also fits on most modern fat bike frames without requiring massive fork offsets or ultra-wide hubs.
Tire Width Recommendations
| Terrain | Recommended Tire Width | Typical Pressure |
|---|---|---|
| Singletrack, hardpack, roots | 3.8″–4.0″ | 10–14 PSI |
| Sand, loose gravel, dry conditions | 4.0″–4.5″ | 8–12 PSI |
| Deep snow, mud, extreme float | 4.5″–5.0″ | 5–10 PSI |
How Do You Choose the Right Frame Material for a Fat Tire Trail Bike?
Choose aluminum if you want the best value and durability for aggressive trail riding; choose carbon if you want to shave weight and dampen vibrations for long backcountry rides. Steel frames are excellent for comfort and strength but add significant weight that you’ll notice on climbs.
Aluminum fat bikes dominate the market because they balance affordability, stiffness, and weight. Carbon fat bikes are more expensive but transform the ride quality by reducing overall weight by 3–5 pounds, making the bike feel nimbler on technical climbs. Steel frames remain popular with bikepackers and winter riders who prioritize durability and a smooth, compliant feel over outright weight savings.
Pros and Cons of Frame Materials
- Aluminum: Affordable, stiff for power transfer, can feel harsh on long rides
- Carbon: Lightweight, excellent vibration damping, expensive, requires careful maintenance
- Steel: Very durable, comfortable ride quality, heavy, can rust if not maintained
Once you find the perfect bike, don’t forget the gear. Safety on rugged trails is critical, but protecting your head doesn’t have to break the bank—make sure to grab a quality mountain bike helmet without overpaying before your first ride.
How Important is Suspension on a Fat Tire Trail Bike?
Suspension is not mandatory on a fat tire trail bike, but it transforms the bike’s capability on rough, high-speed descents. The tire volume already provides significant cushioning at low pressures, but a front suspension fork with 80–120mm of travel significantly improves traction, control, and comfort on technical terrain.
If you ride mostly groomed trails, snow, or sand, a rigid fat bike with a carbon fork is sufficient and saves weight. If you ride rocky singletrack, root-filled descents, or anything with drops, a suspension fork is worth the weight penalty. Many riders start rigid and later add a suspension fork once they discover the limitations of tire-only cushioning on fast, chattery trails.
Rigid vs. Suspension Decision Guide
- Choose rigid if you prioritize simplicity, low maintenance, and weight savings for flat or rolling terrain
- Choose suspension if you ride aggressive descents, drops, or rocky technical trails
- Choose a suspension fork with lockout if you climb steep gradients and want to prevent bob
Which Gearing is Best for Fat Bikes on Trails?
The best gearing for a fat tire mountain bike on trails is a 1x drivetrain with a wide-range cassette (10-50T or similar) and a chainring between 30 and 34 teeth. This provides a low enough gear for crawling up steep, loose climbs and a high enough gear for fast descents on packed surfaces.
Fat bikes are heavier and have more rolling resistance than standard mountain bikes, so you need lower gearing to maintain a comfortable cadence on climbs. A 30T chainring paired with a 10-50T cassette gives you a gear range similar to a standard mountain bike’s granny gear, which is critical when your tires are sinking into soft snow or sand.
Gearing Tips
- Start with a 30T or 32T chainring and adjust based on your local terrain
- Avoid 2x drivetrains—they add complexity and are unnecessary with modern wide-range cassettes
- Consider an oval chainring to improve traction on loose climbs
- Keep your drivetrain clean and lubricated because fat bike components see more grit and moisture
Can You Use a Fat Bike as Your Only Mountain Bike?
Yes, you can absolutely use a fat bike as your primary mountain bike if you ride mostly loose, sandy, snowy, or wet terrain. Many riders now run fat bikes year-round because they are incredibly versatile, especially when equipped with a suspension fork and lighter 3.8-inch tires.
The trade-off is that a fat bike will never feel as snappy or responsive on hardpack, bermed singletrack as a dedicated trail bike with 2.4-inch tires. The extra rotating mass from the large tires and rims makes acceleration slower and requires more effort on climbs. However, for riders who prioritize traction and confidence over all-out speed, a fat bike is a fantastic one-bike solution.
When a Fat Bike Works as Your Only Bike
- You live in an area with long winters and snowy trails
- Your local trails are sandy, loose, or consistently muddy
- You prioritize comfort and stability over aggressive cornering
- You want a bike that doubles as a snow commuter or bikepacker
What Are the Best Fat Bike Brakes for Trail Riding?
Choose hydraulic disc brakes with 180mm or 203mm rotors for reliable stopping power on fat tire trail bikes. The heavier bike mass and higher rolling resistance demand more brake power, especially on long, steep descents where heat buildup can cause fade.
Four-piston calipers are becoming standard on trail-oriented fat bikes and offer superior modulation and stopping power compared to two-piston designs. SRAM’s Level T or G2 R, Shimano’s Deore or SLX, and Tektro’s Orion systems are all reliable choices. Expect to replace pads and bleed brakes more frequently than on a standard bike because fat bikes see more mud, snow, and grit.
Brake Recommendations
- Rider weight under 180 lbs: 2-piston calipers with 180mm rotors are sufficient
- Rider weight over 180 lbs or aggressive riding: 4-piston calipers with 203mm rotors
- Winter riding: Use sintered metallic pads that bite better in cold, wet conditions
How Does Wheel Size Affect Fat Bike Trail Performance?
27.5-inch wheels are the standard for modern fat bikes because they offer a good balance of agility, tire clearance, and availability of tires in the optimal 3.8–4.0 inch width. 26-inch fat bikes are becoming rare and are limited in tire choices, while 29-inch fat bikes exist but are niche and often feel sluggish.
The smaller 27.5-inch diameter allows for shorter chainstays and a more playful feel, while still rolling over obstacles well due to the massive tire volume. When you run a 27.5 x 4.0-inch tire, the overall diameter is similar to a 29 x 2.3-inch tire, so the rollover capability is comparable but with far more traction.
Wheel Size Summary
- 26-inch: Outdated, limited tire choice, mostly found on budget or used bikes
- 27.5-inch: Best all-around choice, wide tire selection, balanced handling
- 29-inch: Less common, rolls over obstacles well but feels less nimble
Can You Upgrade a Budget Fat Bike to Trail-Worthy Performance?
Yes, you can upgrade a budget fat bike to trail-worthy performance, but only if the frame has modern geometry and quality dropouts. A $600 fat bike with a cheap drivetrain and heavy wheels can be transformed with a better tires, a dropper post, and a suspension fork within a reasonable budget.
Focus your upgrades in this order: tires first (the single biggest performance gain), then a dropper post, then contact points (grips, saddle), then a suspension fork if the frame can accept one. Avoid upgrading the drivetrain until it wears out—budget components work fine with proper maintenance. One excellent example of a budget-friendly model that responds well to upgrades is the Mongoose Argus series. You can read more about what makes it a strong foundation for trail riding in this best fat tire mountain bike review.
Smart Upgrade Path
- Replace stock tires with tubeless-compatible 3.8–4.0 inch trail tires
- Install a dropper post (30.9mm or 31.6mm, depending on frame)
- Upgrade grips and saddle for comfort
- Add a suspension fork if budget allows (80–100mm travel)
- Replace drivetrain components as they wear
How Do You Set Up a Fat Bike for Trail Riding Optimal Performance?
Set up your fat bike for trail riding by running the correct tire pressure (10–14 PSI for most conditions), converting to tubeless for lower weight and fewer flats, and installing a dropper post for descending confidence. These three changes make the biggest difference in how the bike feels on technical terrain.
Tire pressure is the most critical adjustment. Start at 12 PSI front and 14 PSI rear on dry singletrack, then lower by 1–2 PSI if you feel the bike bouncing or losing traction. In wet or snowy conditions, drop to 8–10 PSI for maximum float. Use a digital pressure gauge for accuracy because a 1 PSI difference changes the ride dramatically.
Quick Setup Checklist
- Convert tires to tubeless with sealant
- Set tire pressure based on terrain and rider weight
- Adjust suspension fork sag to 25–30% of travel
- Install a dropper post with 150mm or more of travel
- Set handlebar height slightly higher than a standard trail bike for stability
What Should You Avoid When Buying a Fat Tire Mountain Bike?
Avoid buying a fat bike with outdated geometry (very steep head angles above 70 degrees), low-end components that will fail quickly, and excessively heavy wheels that make the bike feel unrideable on climbs. Also avoid bikes with fixed dropouts that prevent future upgrades or tire swaps.
Beware of department store fat bikes that use generic hubs, no-name brakes, and steel rims. These bikes often weigh over 40 pounds and are difficult to upgrade because the frame standards are non-standard. A proper entry-level fat bike from a reputable brand like Mongoose, Salsa, or Surly starts around $900 and offers a platform you can build on.
Red Flags When Shopping
- Head angle steeper than 69 degrees (makes the bike twitchy on descents)
- Quick-release axles instead of thru-axles (limits fork upgrades)
- Cheap coil suspension fork (adds weight without real performance)
- No tubeless-ready rims (you’ll be stuck with tubes and higher weight)
- Bottom bracket that is not standard threaded (PF30 or BB86 can creak)
Once you find the perfect bike, don’t forget the gear. Safety on rugged trails is critical, but protecting your head doesn’t have to break the bank—make sure to grab a quality mountain bike helmet without overpaying before your first ride.
Frequently Asked Questions
Is a fat bike harder to pedal on trails?
Yes, a fat bike requires more effort to pedal due to the heavier wheels and higher rolling resistance. The trade-off is that you can maintain traction in conditions where a standard mountain bike would spin out or sink.
Can I use a fat bike for bike parks and jumps?
You can, but fat bikes are not ideal for bike parks due to their weight and slower handling. They are capable of small jumps and berms but feel less playful than a standard trail or downhill bike.
How often should I replace fat bike tires?
Replace fat bike tires every 1,000 to 2,000 miles depending on terrain and riding style. Sandy and abrasive terrain wears tires faster. Look for worn tread knobs or frequent flats as signs of replacement.
Do I need special pedals for a fat bike?
No, fat bikes use standard pedals. Choose platform pedals for casual riding or clipless pedals for maximum efficiency on longer trail rides. The pedal choice depends on your preference, not the bike type.
Can I ride a fat bike on paved roads?
Yes, but the large tires create significant rolling resistance and noise on pavement. Fat bikes are inefficient on paved roads and are best used on loose surfaces where their traction benefits are fully realized.
What is the best tire pressure for fat bike trail riding?
For singletrack trail riding, start at 10–12 PSI front and 12–14 PSI rear. Lower to 8–10 PSI for snow or sand, and raise to 14–16 PSI for hardpack or gravel. Always adjust based on your weight and trail conditions.
Are fat bikes good for beginners?
Yes, fat bikes are excellent for beginners because the wide tires provide stability and confidence on loose surfaces. The forgiving ride helps new riders focus on technique rather than fighting the trail. They are heavier, so beginners should expect a bit more effort on climbs.
Conclusion
Choosing the right fat tire mountain bike for trail riding comes down to matching the bike’s build to the terrain you ride most. Prioritize tire width between 3.8 and 4.0 inches, a 1x drivetrain with low gearing, and modern geometry with a head angle around 68 degrees. A suspension fork is a worthwhile upgrade if you ride technical descents, while a rigid bike with a carbon fork suits smoother trails. Start with a solid frame from a reputable brand, then dial in your setup with proper tire pressure, tubeless conversion, and a dropper post. Your next trail ride—whether through sand, snow, or singletrack—will be smoother, more controlled, and far more fun when you choose the right fat bike for your needs.


Leave a Reply