

Cooking a perfect roast or ensuring your chicken is safe to eat can feel like guesswork. However, a probe thermometer takes the mystery out of oven cooking. This handy tool helps you achieve perfectly cooked meals every time. Whether you’re preparing a holiday turkey or a weeknight dinner, understanding how to use this device will elevate your cooking skills.
What Is a Probe Thermometer
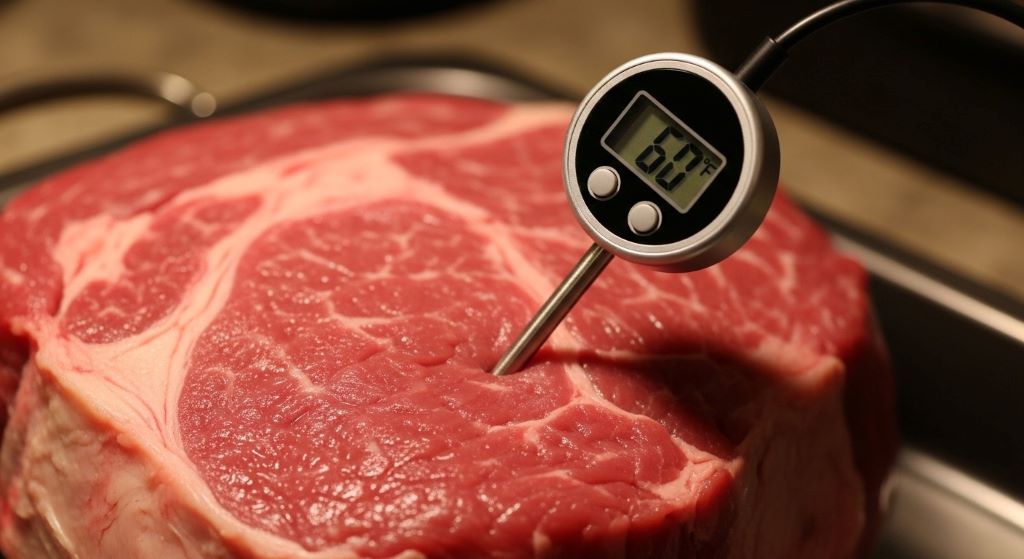
A probe thermometer consists of a metal probe attached to a heat-resistant wire. The wire connects to a digital display that sits outside your oven. Unlike instant-read thermometers, this type stays in your food throughout the cooking process. Therefore, you can monitor temperature without opening the oven door repeatedly.
The metal probe inserts directly into the thickest part of your meat or dish. Meanwhile, the display unit remains outside where you can easily read it. Some models even feature alarms that alert you when food reaches the desired temperature. This design makes cooking more convenient and accurate.
Why You Need This Tool
Traditional cooking methods rely on timing and appearance. However, ovens vary in temperature accuracy. Additionally, different cuts of meat cook at different rates. A probe thermometer eliminates these uncertainties.
Food safety represents another crucial reason to use this device. Undercooked poultry or pork can harbor harmful bacteria. Conversely, overcooking dries out your meal and wastes money. The thermometer helps you hit that perfect sweet spot between safety and quality.
Furthermore, this tool saves energy. You won’t need to open the oven door to check doneness. Each time you open the door, heat escapes and cooking time increases. Keeping the door closed maintains consistent temperature and reduces cooking duration.
Getting Started With Your Leave-In Thermometer Guide
Before your first use, read the manufacturer’s instructions carefully. Different models have varying temperature ranges and features. Some thermometers work with specific oven types only. Verify that yours suits your cooking style and equipment.
Next, ensure your thermometer is clean and calibrated. Most devices come pre-calibrated, but testing accuracy helps prevent cooking disasters. Fill a glass with ice water and insert the probe. The reading should show 32 degrees Fahrenheit or 0 degrees Celsius. If not, consult your manual for calibration steps.
Proper probe placement makes all the difference. Insert the probe into the thickest part of the meat, avoiding bones and fat pockets. Bones conduct heat differently than meat, giving false readings. Fat pockets also skew results. For poultry, the inner thigh works best. With roasts, aim for the center.
Essential Roasting Tips for Success
Understanding target temperatures forms the foundation of successful roasting. Different meats require different internal temperatures for safety and optimal taste. Chicken and turkey need to reach 165 degrees Fahrenheit. Beef roasts vary depending on desired doneness, ranging from 125 degrees for rare to 160 degrees for well-done. Pork should hit 145 degrees with a three-minute rest period.
Always start with room temperature meat when possible. Cold meat from the refrigerator cooks unevenly. Let your roast sit out for 30 minutes before cooking. This practice ensures more uniform cooking and better results.
Season your meat before inserting the probe. Once the probe is in place, avoid moving it around. Each movement creates a hole that releases valuable juices. Plan your probe placement carefully from the start.
Step-by-Step Instructions
Begin by preheating your oven to the recipe’s specified temperature. While the oven heats, prepare your meat with seasonings and marinades. Place the meat in your roasting pan or baking dish.
Thread the probe’s wire through the oven door seal. Most modern ovens have a small notch designed for this purpose. If yours doesn’t, the wire is thin enough to fit through the door’s edge without causing damage. Close the door gently, ensuring the wire isn’t pinched tightly.
Insert the probe into your meat at a slight angle. Push it deep enough to reach the center but not so far that it pokes through the other side. The tip of the probe should sit in the thickest portion of the meat. For whole birds, angle it downward into the thigh.
Set your thermometer’s alarm if it has this feature. Program the target temperature based on what you’re cooking. This alarm allows you to focus on other tasks without constantly checking the display. However, keep an eye on the temperature as it approaches your target.
Monitoring the Cooking Process
Watch the temperature climb gradually as your food cooks. Initially, the temperature rises quickly. Then, it slows as the meat approaches doneness. This pattern is normal and expected.
Note the temperature about 10 degrees before your target. At this point, the meat enters the critical zone. Temperatures can rise quickly during the final stage. Additionally, carryover cooking continues after you remove the meat from the oven. The internal temperature typically increases another 5 to 10 degrees during resting.
Avoid opening the oven door during cooking. The probe thermometer’s entire purpose is to eliminate this need. Each door opening drops the oven temperature by 25 degrees or more. This fluctuation extends cooking time and can affect results.
Troubleshooting Common Issues
Sometimes the temperature seems stuck or rises too slowly. This situation often indicates incorrect probe placement. The probe might be touching bone or sitting in a fatty area. Unfortunately, you’ll need to reposition it, which means opening the oven briefly.
If readings fluctuate wildly, check the wire connection. Loose connections cause erratic readings. Ensure the wire is firmly attached to both the probe and display unit. Additionally, verify that the wire isn’t damaged or kinked.
Inaccurate readings despite proper placement suggest calibration problems. Test your thermometer in ice water between uses. If consistently off by several degrees, recalibrate or replace the unit. Accuracy matters too much to ignore persistent errors.
Advanced Techniques for Better Results
Consider using two thermometers for large roasts or whole birds. Place one probe in each end or in different sections. This approach helps identify hot spots and ensures even cooking throughout. The extra information guides decisions about rotating the pan or adjusting oven temperature.
Experiment with lower and slower cooking methods. The probe thermometer excels at monitoring extended cooking times. Many cooks achieve superior results by roasting at 275 degrees instead of 350 degrees. The lower temperature cooks more evenly, though it takes longer. Your thermometer tracks progress regardless of the chosen temperature.
Learn the temperature gradient in your meat. The outer portions cook faster than the center. Understanding this gradient helps predict when your roast will finish. Experienced cooks can estimate remaining time by monitoring the temperature’s rate of increase.
Caring for Your Thermometer
Proper maintenance extends your thermometer’s lifespan. Clean the probe after each use with hot soapy water. Avoid submerging the display unit unless it’s specifically waterproof. Most displays aren’t designed for immersion and will malfunction if soaked.
Store the probe and wire carefully. Tangled or kinked wires can break internal connections. Coil the wire loosely and secure it with a twist tie. Keep the display and probe together in a drawer or cabinet where they won’t get crushed by other items.
Replace batteries before they die completely. Weak batteries cause inconsistent readings and slow response times. Most thermometers use common battery types available at any store. Check your manual for the specific battery required.
Making the Most of Your Investment
A quality probe thermometer costs between 20 and 60 dollars. This investment pays for itself quickly through perfectly cooked meals and reduced food waste. Choose a model with a long wire to accommodate large ovens. Additionally, look for displays that are easy to read from a distance.
Wireless models offer extra convenience but cost more. These units transmit temperature data to your phone or a separate receiver. You can monitor cooking from another room. However, basic wired models work excellently for most home cooks.
Consider thermometers with multiple probes if you frequently cook several items simultaneously. These systems let you monitor a roast and side dish at the same time. The convenience justifies the higher price for busy cooks.
Beyond Basic Roasting
Probe thermometers work for more than just meat. Use them for baking bread to ensure the interior reaches proper temperature. Casseroles and stuffing also benefit from temperature monitoring. Food safety guidelines apply to all dishes, not just meat.
Candy making and oil temperature monitoring are other applications. However, verify that your thermometer can handle the required temperature range. Standard meat thermometers typically max out around 400 degrees. Candy thermometers need to reach much higher temperatures.
Some adventurous cooks use probe thermometers for sous vide cooking or smoker monitoring. The versatility of these tools extends far beyond the oven. Explore different applications to maximize your investment.
Building Confidence in the Kitchen
Using a probe thermometer might feel awkward initially. However, practice builds comfort and skill. Start with simple roasts before tackling complicated recipes. Each successful meal increases your confidence.
Keep a notebook of cooking times and temperatures for your favorite recipes. Document what worked and what needs adjustment. This personal reference becomes invaluable for recreating successful dishes. Additionally, notes help you troubleshoot problems when results disappoint.
Trust the thermometer over appearance or timing alone. Meat can look done but still be raw inside. Conversely, well-cooked meat sometimes appears underdone due to myoglobin content. The temperature never lies when measured correctly.
Understanding Temperature Carryover
After removing meat from the oven, the internal temperature continues rising. This phenomenon, called carryover cooking, happens because heat from the outer portions migrates inward. The effect lasts about 10 to 15 minutes.
Plan for carryover by removing your roast 5 to 10 degrees below the target temperature. For example, if you want beef at 135 degrees, remove it at 125 to 130 degrees. The temperature will climb to your target during resting. This technique prevents overcooking and ensures juicy results.
Always let meat rest after cooking. Resting allows juices to redistribute throughout the meat. Cutting immediately causes those juices to run out onto the cutting board. A proper rest period, typically 10 to 20 minutes, makes a significant difference in texture and moisture.
Safety Considerations
Always handle hot probes carefully. The metal probe retains heat long after leaving the oven. Use oven mitts when removing the probe from cooked meat. Set the hot probe on a heat-resistant surface, never directly on countertops.
Keep the wire away from oven heating elements. Direct contact can melt the wire’s protective coating. Route the wire carefully inside the oven. Most probes tolerate high temperatures, but contact with heating elements exceeds safe limits.
Never use a probe thermometer in a microwave. The metal components will cause dangerous sparking and damage both the thermometer and microwave. Microwaves require special thermometers designed for that purpose.
When to Replace Your Thermometer
Even quality thermometers eventually need replacement. Consistent inaccuracy despite calibration attempts signals the end of useful life. Additionally, physical damage to the probe or wire requires replacement rather than repair.
Most thermometers last several years with proper care. However, frequent use or accidents can shorten lifespan. Consider replacement when your thermometer becomes unreliable. The cost of a new unit is minimal compared to ruined meals.
Technology improvements also motivate upgrades. Newer models feature better accuracy, faster response times, and enhanced features. Evaluate whether these improvements justify replacing a functioning older model.
Conclusion
Mastering the probe thermometer transforms your cooking from guesswork to precision. This simple tool ensures food safety while delivering perfectly cooked results every time. By following proper insertion techniques, monitoring temperatures carefully, and understanding carryover cooking, you’ll achieve restaurant-quality results at home.
The leave-in thermometer guide principles covered here apply to all cooking situations. Whether preparing a holiday feast or a simple weeknight dinner, these roasting tips help you succeed. Remember that practice builds skill and confidence grows with each successful meal.
Invest in a quality thermometer, learn proper techniques, and trust the temperature readings. Your family and guests will appreciate the consistently delicious results. Moreover, you’ll enjoy reduced stress and increased confidence in the kitchen. The probe thermometer isn’t just a tool; it’s your partner in creating memorable meals.
Frequently Asked Questions
Can I leave the probe thermometer in the oven during the entire cooking time?
Yes, that’s exactly what these thermometers are designed for. The probe remains in your food while it cooks, and the heat-resistant wire runs through the oven door to the external display. This design allows continuous monitoring without opening the oven door.
What’s the difference between a probe thermometer and an instant-read thermometer?
A probe thermometer stays in the food throughout cooking, while an instant-read thermometer is inserted briefly to check temperature and then removed. Probe thermometers work inside closed ovens, whereas instant-read models are not designed for continuous oven exposure. Each type serves different purposes in the kitchen.
How do I know where to insert the probe for accurate readings?
Insert the probe into the thickest part of the meat, avoiding bones, fat pockets, and gristle. For whole poultry, the inner thigh provides the most accurate reading. For roasts, aim for the center. The probe tip should rest in the middle of the thickest section for best results.
Can I use my oven probe thermometer on the grill or smoker?
Most oven probe thermometers work equally well in grills and smokers, provided the wire can exit safely. Check your model’s maximum temperature rating. Many handle up to 700 degrees, suitable for most grilling. However, some lower-end models have limitations. Always verify specifications before using in high-heat environments.
Why does my meat’s temperature rise after removing it from the oven?
This phenomenon, called carryover cooking, occurs because the outer portions of meat are hotter than the center. After removing from heat, this temperature difference equalizes as heat migrates inward. The internal temperature typically rises 5 to 10 degrees during resting. Plan for this by removing meat slightly below your target temperature.
Related Topics:
Picking the Best BBQ Sides in Athens, Alabama Barbecue Restaurants
Gansito Cake Recipe Inspired by Mexican Snack Cakes

Leave a Reply