

Imagine moving groceries from the garage to the kitchen without climbing stairs. A dumbwaiter makes this possible. It’s a small lift that carries items between floors, saving time and effort. Installing one in your townhouse boosts convenience and adds value. According to the U.S. Census Bureau, 12% of U.S. homes are multi-story, making dumbwaiters a growing trend. The National Association of Home Builders reports that 68% of homeowners prioritize home improvements like these for functionality. Ready to install a dumbwaiter? This guide walks you through the process step by step.
What Is a Dumbwaiter and Why Install One?
A dumbwaiter is a compact elevator for moving items, not people. It’s perfect for townhouses with multiple floors. Common uses include transporting groceries, laundry, or heavy objects. Here’s why you should consider one:
- Convenience: Saves trips up and down stairs.
- Efficiency: Speeds up tasks like moving supplies.
- Property Value: Adds a unique feature to your home.
- Safety: Reduces strain from carrying heavy loads.
Dumbwaiters come in various types, like hydraulic lifts or cable pulley systems. They suit homes, restaurants, or even the food service industry. Let’s explore how to install one in your townhouse. Also, check out Cost-Effective Strategies for Roof Maintenance and Longevity.
Step-by-Step Guide to Installing a Dumbwaiter
Installing a dumbwaiter requires planning, tools, and safety checks. Follow these steps for a smooth process.
Step 1: Conduct a Site Assessment
Before starting, assess your townhouse. A proper site assessment ensures the dumbwaiter fits your space and meets building codes. Hire a general contractor or professional installer for accuracy. Here’s what to check:
- Space Availability: Measure the area for the lift shaft. Most dumbwaiters need a 2×2-foot space.
- Structural Support: Confirm walls can handle the dead load and live load of the dumbwaiter.
- Electrical Requirements: Ensure access to an electrical outlet or power supply for electric motors.
- Building Codes: Check local regulations, like those from the American Society of Mechanical Engineers or Canadian CSA-B44.
A contractor’s license may be required for permits. Consult your local authority to avoid fines.
Step 2: Choose the Right Dumbwaiter
Select a dumbwaiter that fits your needs. Consider these factors:
- Carrying Capacity: Most residential dumbwaiters handle 50–200 pounds. Check load capacity for your needs.
- Custom Size: Some townhouses need tailored dimensions for tight spaces.
- Material: Stainless steel is durable and easy to clean. It’s ideal for kitchens.
- Drive System: Choose between hydraulic systems, winding drums, or cable types like aircraft cable.
- Safety Features: Look for safety switches, emergency stop buttons, and safety locks.
Brands like DME Elevators & Lifts offer reliable options. Research searchable articles or consult a dumbwaiter advisor for recommendations.
Step 3: Prepare the Installation Site
Once you’ve chosen your dumbwaiter, prepare the site. This step involves:
- Clearing the Area: Remove furniture or obstacles near the lift shaft.
- Building the Shaft: Construct a hoist-way with hoist-way doors for access. Ensure it’s level and sturdy.
- Reinforcing Floors: Strengthen building floors to support the dumbwaiter’s weight.
- Electrical Setup: Install wiring for control panels and the motor assembly. A vacuum pump or hydraulic oil system may need extra setup.
Work with a professional installer to meet safety precautions and avoid errors. For example, mason Mike Mehaffey, a building science expert, stresses the importance of precise measurements.
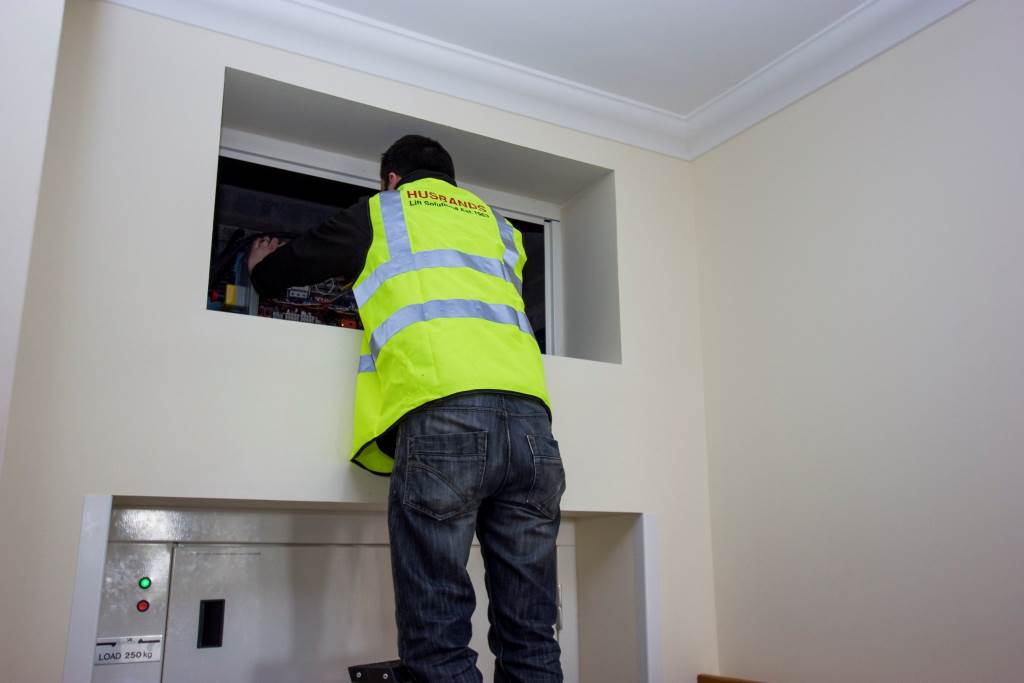
Step 4: Install the Dumbwaiter Components
Now, install the dumbwaiter. Follow these steps:
- Install the Guide Rail: Secure the guide rail to keep the elevator cab stable.
- Add the Drive System: Mount the electric motors, winding drum, or hydraulic system. Ensure proper alignment.
- Set Up the Cable System: Use a cable pulley system with aircraft cable for smooth movement.
- Install the Car Gate: Attach the car gate for safety. It prevents items from falling out.
- Connect Control Panels: Wire control panels and safety switches for easy operation.
Test the system for smooth operation. Check load sensors to ensure they detect weight accurately.
Step 5: Perform Safety Checks
Safety is critical. Conduct these safety checks:
- Verify safety switches and emergency stop buttons work.
- Test safety locks on hoist-way doors.
- Ensure the dumbwaiter meets employee safety standards if used commercially.
- Check for smooth operation without jerks or noises.
The Fine Homebuilding Summit emphasizes regular safety checks to prevent accidents.
Step 6: Finalize and Test the Installation
Once installed, test the dumbwaiter thoroughly. Run it with light and heavy loads. Confirm the drive belt or cable type operates without issues. Check energy efficiency to keep costs low. If using a vacuum elevator, ensure the vacuum pump functions correctly.
Document the installation process for future maintenance tips. Keep records of electrical requirements and building codes met.
Costs of Installing a Dumbwaiter
The cost of installing a dumbwaiter varies. Expect to pay $3,000–$10,000, depending on:
- Dumbwaiter Type: Hydraulic lifts cost more than cable systems.
- Custom Features: Custom size or stainless steel increases costs.
- Labor: Hiring a general contractor or professional installer adds $1,000–$3,000.
- Permits: Building codes may require permits, costing $100–$500.
For accurate pricing, request quotes from suppliers like Elevation Innovation.
Maintenance Tips for Longevity
Keep your dumbwaiter in top shape with these maintenance tips:
- Regular Inspections: Check cables, pulleys, and safety features monthly.
- Lubricate Moving Parts: Use hydraulic oil or lubricant for smooth operation.
- Clean the Cab: Wipe down stainless steel surfaces to prevent corrosion.
- Test Safety Switches: Ensure emergency stop buttons and load sensors work.
- Schedule Professional Checks: Hire a technician annually for thorough inspections.
Old House Journal suggests keeping a maintenance log for tracking.
Benefits of Dumbwaiters in Townhouses
Dumbwaiters offer more than convenience. They improve your home in these ways:
- Time-Saving: Move items quickly between floors.
- Space Efficiency: Fits in small spaces, unlike full elevators.
- Versatility: Ideal for material handling in multi-story homes.
- Modern Appeal: Adds a high-tech touch, like a Schlage Keyless Entry Deadbolt.
Case Study: A New York townhouse owner installed a dumbwaiter to move groceries from the garage to the kitchen. They saved 30 minutes daily and reduced physical strain. Explore Business-Approved Benefits of Commercial Window Replacement in Athens AL.
Common Challenges and Solutions
Installing a dumbwaiter can have hurdles. Here’s how to address them:
- Challenge: Limited space for the lift shaft.
Solution: Opt for a custom size or VRC material lifts for compact designs. - Challenge: Meeting building codes.
Solution: Consult the American Society of Mechanical Engineers or local authorities early. - Challenge: High installation costs.
Solution: Compare quotes and choose energy-efficient models to save long-term. - Challenge: Electrical setup issues.
Solution: Hire a licensed electrician to ensure proper wiring.
Start Your Dumbwaiter Project Today
Installing a dumbwaiter in your townhouse is a smart home improvement. It saves time, adds convenience, and boosts property value. By following this guide, you’ll navigate the installation process with ease. From site assessment to safety checks, each step ensures a smooth project. Ready to lift your home’s functionality? Contact a professional installer or visit Green Building Advisor for more resources. Start your dumbwaiter project today!
FAQs
What is the cost of installing a dumbwaiter in a townhouse?
Costs range from $3,000 to $10,000, depending on type, size, and labor.
Do I need a permit to install a dumbwaiter?
Yes, most areas require permits to meet building codes. Check local regulations.
How long does dumbwaiter installation take?
Installation takes 2–5 days, depending on complexity and site preparation.
Can I install a dumbwaiter myself?
DIY is possible but risky. Hire a professional installer for safety and compliance.
What safety features should a dumbwaiter have?
Look for safety switches, emergency stop buttons, and load sensors.
References
- U.S. Census Bureau: https://www.census.gov/housing
- National Association of Home Builders: https://www.nahb.org
- American Society of Mechanical Engineers: https://www.asme.org
- Canadian CSA-B44 Standards: https://www.csagroup.org
- Green Building Advisor: https://www.greenbuildingadvisor.com
- Old House Journal: https://www.oldhouseonline.com
- Fine Homebuilding Summit: https://www.finehomebuilding.com
Leave a Reply