
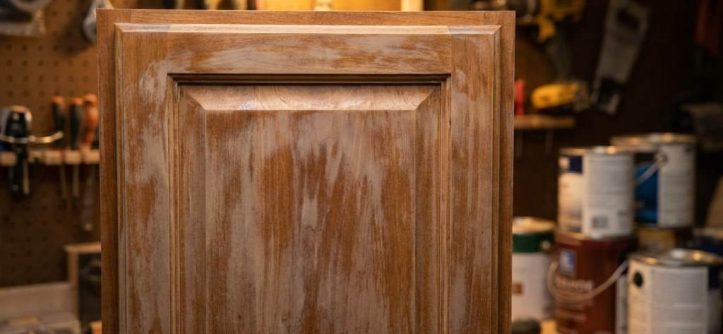
Cabinet finish turns muddy in Austin, TX mainly because humidity, heat, grease, and improper cleaning affect the coating. Austin receives roughly 34 inches of annual rain, while summer temperatures regularly exceed 90°F. These conditions can make finishes look cloudy, dull, sticky, or strangely brown. Even learning how to mix black paint will not solve the issue when the underlying finish remains contaminated.
Key Takeaways
- High humidity can slow drying and trap contaminants inside cabinet coatings.
- Kitchen grease creates a stubborn film that makes finishes appear muddy.
- Harsh cleaners can dull clear coats and change their visual appearance.
- Dark cabinet colors reveal cloudy residue more quickly than lighter finishes.
- Proper cleaning, drying, and controlled humidity can prevent recurring problems.
- Severely damaged finishes may require professional stripping, sanding, and refinishing.
What Makes Cabinet Finish Look Muddy in Austin?
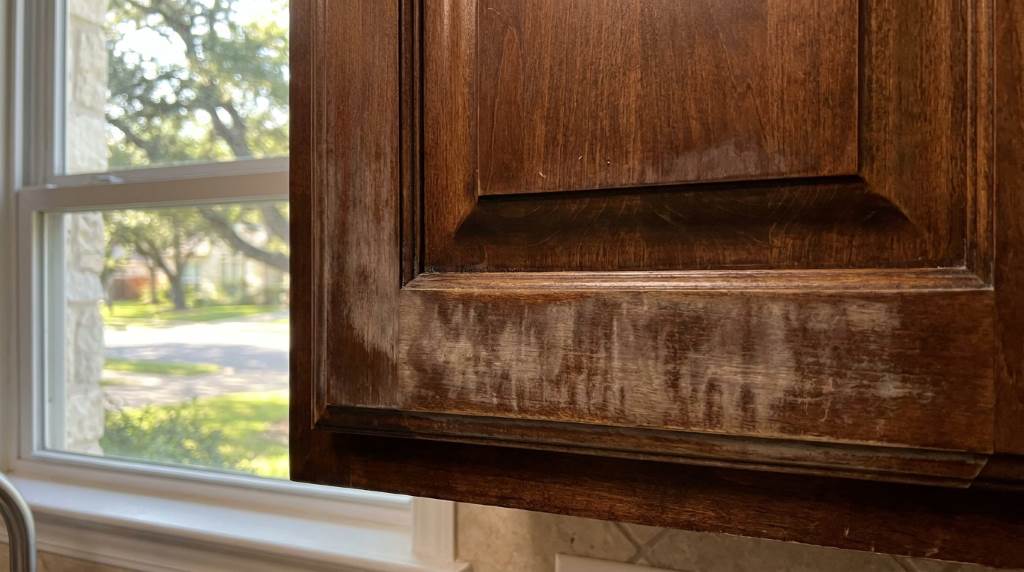
A muddy cabinet finish usually develops when several surface problems overlap instead of appearing from one isolated cause. Heat, moisture, cooking residue, dust, and incompatible cleaners can gradually alter the finish. Therefore, identifying the residue before cleaning prevents unnecessary damage.
Austin’s climate creates an especially challenging environment for kitchen cabinetry. Warm air holds moisture, while frequent temperature changes can affect wood movement and coating performance. Additionally, homes with limited ventilation can retain humidity around cabinets for longer periods.
Grease also plays a major role in kitchens with frequent cooking activity. Tiny airborne grease particles settle onto doors, frames, and hardware before mixing with household dust. Over time, that combination creates a brownish film that resembles damaged finish.
Some finishes also become visually cloudy after repeated exposure to moisture. Water can enter tiny imperfections, seams, or porous areas around unfinished edges. Consequently, the surface may lose its original clarity without actually losing its entire protective coating.
Dark paints can make the problem appear worse because they reveal residue, haze, and uneven sheen more clearly. Meanwhile, satin and semi-gloss coatings can develop noticeable patches after aggressive spot cleaning. The result often looks like inconsistent paint rather than surface contamination.
How Austin Humidity Changes Cabinet Coatings
Humidity affects cabinet finishes differently depending on the coating type, application method, and ventilation. Water-based coatings generally tolerate normal indoor conditions, but excessive moisture can interfere with curing. Oil-based products can also react poorly when moisture, heat, and poor airflow combine.
For broader household maintenance, rethinking plastic waste can also encourage better cleaning choices. Reducing disposable chemical-heavy products helps homeowners choose simpler cleaning methods. More importantly, fewer unnecessary products reduce the chance of incompatible cleaners reaching cabinet surfaces.
Humidity becomes particularly troublesome when cabinets sit near sinks, dishwashers, or poorly ventilated cooking areas. Steam repeatedly contacts nearby surfaces and can soften accumulated grime. Eventually, wiping that softened residue can spread it across the cabinet instead of removing it.
Indoor humidity also matters after painting or refinishing work. Fresh coatings need suitable temperature and moisture conditions to cure correctly. If the coating remains vulnerable during cleaning, rubbing can create uneven gloss or cloudy patches.
Signs Moisture Plays a Role
- Cloudiness appears near sinks, dishwashers, or plumbing fixtures.
- Cabinet edges look darker than the center panels.
- Finish feels slightly tacky after humid weather.
- Haze returns shortly after wiping the surface.
- Wood appears swollen around joints or exposed edges.
If these signs appear together, improve ventilation before attempting aggressive cleaning. Run exhaust fans during cooking and allow damp areas to dry completely. Also, inspect plumbing connections because hidden leaks can repeatedly expose cabinetry to moisture.
Why Grease and Cleaning Products Create a Muddy Appearance
Kitchen grease rarely remains pure after settling onto cabinetry. Instead, it bonds with dust, smoke particles, skin oils, and cleaning residue. This mixture creates a stubborn film that ordinary water cannot remove effectively.
Some homeowners then compensate by using stronger chemicals or excessive scrubbing. However, affordable robot vacuum mop solutions can reduce floor dust that eventually reaches nearby cabinetry. Less airborne debris means less material available to combine with kitchen grease.
Degreasers can help, but the wrong formula may damage certain cabinet coatings. Strong solvents can soften finishes, remove protective layers, or alter sheen. Likewise, abrasive sponges can leave microscopic scratches that scatter light across the surface.
Even common household cleaners can create problems when used too frequently. Some products leave surfactant residue behind after evaporation. That residue attracts additional dust and eventually produces a dull, uneven appearance.
A Safer Cleaning Sequence
Start by removing loose dust with a clean, soft microfiber cloth. Next, mix a small amount of mild dish soap with warm water. Dip the cloth into the solution, wring it thoroughly, and wipe one manageable section.
Afterward, use another cloth lightly dampened with clean water. Remove remaining soap before drying the surface immediately. This two-cloth method limits residue while preventing excessive moisture from remaining on the finish.
Always test the method inside a cabinet door before cleaning visible surfaces. Different paints, lacquers, varnishes, and factory coatings react differently. Therefore, a small test area can prevent a costly cabinet-wide mistake.
Could the Cabinet Finish Itself Be Failing?
Sometimes cleaning exposes a deeper coating problem rather than causing it. Clear coats can yellow, oxidize, crack, or lose uniformity as they age. Heat and ultraviolet exposure can accelerate these changes, especially near bright windows.
Wood cabinetry can also develop finish deterioration around frequently touched areas. Hands transfer oils and moisture onto doors repeatedly throughout the day. Eventually, these areas may appear darker, glossier, or more worn than surrounding surfaces.
Another possibility involves incompatible products applied during previous maintenance. For example, waxes, oils, silicone products, and certain polishes can build layers over existing coatings. Those layers may produce a hazy appearance that resembles failing paint.
When the finish feels smooth but looks cloudy, accumulated residue remains a strong possibility. When the surface feels rough, sticky, cracked, or uneven, coating failure becomes more likely. This distinction helps determine whether cleaning or refinishing makes sense.
Three Quick Tests Before Refinishing
- Cloth test: Wipe a hidden section with mild soap solution and inspect the cloth.
- Gloss test: Compare the affected area with a protected cabinet interior.
- Texture test: Feel for stickiness, roughness, raised grain, or cracking.
If the cloth collects brown residue, surface contamination probably contributes to the muddy appearance. If nothing transfers but the finish remains cloudy, inspect the coating itself. Never sand immediately because unnecessary abrasion can make a repair harder.
How to Fix a Muddy Cabinet Finish Without Making It Worse
Begin with diagnosis rather than choosing a stronger cleaner. Identify whether grease, moisture, residue, oxidation, or coating failure creates the appearance. Then select the least aggressive method that addresses the actual problem.
For ordinary grease buildup, mild detergent usually provides enough cleaning power. Work in small sections and avoid soaking cabinet doors. Immediately drying each section prevents water from lingering around seams and edges.
For persistent residue, repeat gentle cleaning instead of increasing chemical strength immediately. Several controlled passes often remove buildup more safely than one aggressive treatment. Furthermore, clean microfiber cloths reduce the chance of redistributing loosened grime.
If the coating remains cloudy after careful cleaning, stop experimenting with household products. Additional chemicals may worsen the finish and complicate professional restoration. At that stage, identify the coating type before choosing any refinishing procedure.
When Sanding Becomes Appropriate
Sanding makes sense when the existing coating has widespread damage or poor adhesion. However, sanding should follow proper surface evaluation rather than guesswork. Removing too much material can expose veneer, alter profiles, or damage cabinet edges.
For painted cabinets, technicians often use controlled sanding to create a suitable surface for primer and new paint. For stained wood, the process requires greater care because the underlying color can change quickly. Veneered panels demand especially cautious preparation.
Professional refinishing becomes worthwhile when cabinets show widespread peeling, severe discoloration, or persistent coating failure. It also makes sense when previous DIY repairs created multiple uneven layers. A controlled restoration can produce a more consistent finish than repeated spot repairs.
How to Prevent Muddy Cabinet Finish in Austin
Prevention starts with controlling the conditions that create buildup. Use the kitchen exhaust fan whenever cooking produces steam, smoke, or heavy grease. Also, keep cabinet surfaces dry around sinks and appliances.
Clean light grease before it becomes a hardened film. A quick weekly wipe usually requires less effort than removing months of accumulated residue. Focus especially on areas surrounding handles, cooktops, ovens, and frequently opened doors.
Choose cleaning products according to the cabinet manufacturer’s finish recommendations. Avoid automatically using vinegar, bleach, ammonia, alcohol, or abrasive powders. A product that works elsewhere may permanently change a cabinet coating.
Keep microfiber cloths dedicated to cabinet cleaning whenever possible. Dirty cloths can carry grit, grease, and old chemical residue back onto freshly cleaned surfaces. Wash them properly and avoid fabric softeners that can leave unwanted residues.
Maintain reasonable indoor humidity during Austin’s wetter periods. Good ventilation reduces condensation and helps cabinet surfaces dry faster. If humidity remains consistently high, a properly sized dehumidifier can provide additional control.
A Simple Monthly Cabinet Maintenance Routine
- Inspect cabinet edges, corners, and areas surrounding plumbing.
- Remove visible grease using a mild cleaning solution.
- Dry doors, frames, and seams completely after cleaning.
- Check for peeling, bubbling, cracking, or unusual discoloration.
- Test unfamiliar cleaners on hidden surfaces first.
- Inspect ventilation around cooking and dishwasher areas.
This routine takes little time but catches developing problems before they become expensive repairs. More importantly, it separates routine maintenance from unnecessary refinishing. Consistency protects cabinet appearance better than occasional aggressive cleaning.
When You Should Call a Cabinet Refinishing Professional
Call a professional when cleaning fails to improve the appearance or reveals widespread coating damage. Persistent tackiness, peeling, bubbling, cracking, or severe yellowing often requires specialized treatment. Professionals can identify coating chemistry before recommending sanding or replacement.
Professional assessment also matters when cabinets contain valuable wood veneer or custom finishes. Aggressive DIY sanding can permanently remove thin decorative layers. Similarly, unknown factory coatings may react unpredictably to solvents or primers.
Ask the contractor to explain the suspected cause before approving refinishing work. A reliable assessment should distinguish contamination from coating failure. It should also explain preparation, ventilation, curing conditions, and expected maintenance requirements.
Before hiring anyone, request photos of comparable cabinet projects and a written scope of work. Confirm which surfaces receive preparation, primer, finish coats, and final inspection. Clear documentation reduces misunderstandings and helps you compare estimates fairly.
Final Verdict: Why Cabinet Finish Turns Muddy in Austin, TX
In most Austin kitchens, a muddy cabinet finish results from accumulated grease, moisture, residue, or gradual coating deterioration. Climate conditions can accelerate these problems, but homeowners can often prevent them through controlled cleaning and ventilation.
Start with gentle cleaning and careful inspection before considering sanding or refinishing. If the appearance persists, investigate the coating rather than repeatedly applying stronger chemicals. Taking this measured approach protects the finish and avoids unnecessary repair costs.
For homeowners facing stubborn discoloration, professional evaluation can reveal whether restoration or replacement offers better value. Take action early, document the problem, and choose a treatment based on the actual cause. Your cabinets can regain a clean, consistent appearance without unnecessary damage.
FAQs About Muddy Cabinet Finish in Austin
Why do my cabinets look cloudy after cleaning?
Cloudiness often comes from cleaner residue, grease film, moisture, or damage to the cabinet’s protective coating.
Can Austin humidity damage painted cabinets?
Yes, excessive humidity can slow coating curing, encourage moisture intrusion, and contribute to cloudy or deteriorating finishes.
What cleaner should I use on muddy cabinets?
Use a mild dish soap solution with a soft microfiber cloth unless the manufacturer recommends another cleaner.
Should I sand cabinets that look muddy?
No, determine whether residue or coating failure causes the problem before sanding any cabinet surface.
When should I refinish my kitchen cabinets?
Consider refinishing when cleaning cannot correct widespread peeling, cracking, discoloration, or persistent coating failure.
Conclusion
A muddy cabinet finish does not automatically mean your cabinets need replacement. Diagnose the surface first, remove contamination gently, control moisture, and monitor the coating. If those steps fail, consult a qualified refinishing professional before making permanent changes.
Take a close look at your cabinets this week and address early signs of haze or residue. Early maintenance can preserve the finish, reduce restoration costs, and keep your kitchen looking professionally maintained.



Leave a Reply